Unlocking the Secrets to Renting Success: Tips for Northern Illinois Renters

Hey there, Northern Illinois renters! Whether you’re navigating the bustling rental market in the Chicago suburbs or finding your cozy spot in one of the charming smaller towns, renting can come with its own set of challenges. Don’t worry—I’ve got some handy tips to help you make the most of your renting experience.

1. Know Your Budget: More Than Just Rent

When budgeting for a rental, don’t just consider the monthly rent. Factor in utilities, which can vary depending on the season and your usage. Also, set aside some funds for unexpected expenses like minor repairs or maintenance. A good rule of thumb is to keep your total housing costs (rent plus utilities) at around 30% of your monthly income. This ensures you can comfortably cover your living expenses and still have some room for savings.

2. Inspect Thoroughly Before Signing

Before you put pen to paper, make sure to do a thorough walkthrough of the rental. Check for any signs of damage or issues like leaky faucets, drafty windows, or faulty appliances. Take note of these things and bring them up with the landlord before you sign the lease. It’s also a good idea to take photos of the condition of the property when you move in—just in case you need to reference them later.

3. Understand Your Lease Agreement

Lease agreements can be packed with legal jargon, so it’s crucial to read through everything carefully. Pay close attention to the length of the lease, the rent payment schedule, and the terms for breaking the lease early. Make sure you understand your responsibilities regarding maintenance and repairs. If something isn’t clear, don’t hesitate to ask your landlord or seek advice from a legal expert.

4. Get to Know Your Neighborhood

Northern Illinois is home to some fantastic neighborhoods, each with its own unique vibe. Spend some time exploring your new area. Check out local parks, grocery stores, and dining options. Knowing your neighborhood can help you feel more at home and may even reveal some hidden gems you wouldn’t have discovered otherwise.

5. Build a Good Relationship with Your Landlord

A positive relationship with your landlord can make your renting experience smoother. Communicate openly and promptly about any issues or maintenance requests. Being respectful and responsive can also work in your favor if you need to negotiate lease terms or address problems.

Happy renting, everyone! With these tips in your back pocket, you’re well on your way to a successful and enjoyable renting experience in Northern Illinois. If you have any more questions or need advice on anything rental-related, drop a comment or reach out.

10 Helpful Tips to Make Moving with Kids a Breeze!

Moving can be a stressful experience, between all the packing and the amount of required paperwork alone.  Moving with kids can add another layer of emotional (and sometimes physical) stress.  To help ease the transition, check out these ten tips that can make the whole process that much easier for your entire household.

  1. Explain why you’re moving.  Whether you have a new job opportunity or you’re changing your living situation, it’s important to explain to your kids why you’re moving.  Even if things are less than favorable – perhaps you’ve been evicted and now are moving out of necessity – taking the time to sit with your kids and talk about the move is important.  Hold an open forum for the family to address any concerns about why you’re moving, and what it means for them.
  2. Get your kids involved in the moving process.  Involving your children, both older and younger, in the moving process can make them feel as if they’re an important part of your efforts and an important member of the household team. As you prepare your moving to-do list, consider creating or identifying projects that the kids can help with, or possibly handle themselves.  Even the littlest task can make a big difference from their perspective.  Tasks for your children might include:
      • Bigger Kids: in charge of packing their rooms
      • Smaller Kids: errand buddy for things like picking up boxes and donation runs
      • Bigger and Smaller Kids Both: helping to clean up various rooms or messes
  3. Take your kids to visit the new neighborhood.  Sometimes this won’t be an option, but if you can, take a walk or drive around your new neighborhood.  A visit like this can give your kids a sense of knowing where they’re going, rather than feelings associated with the unknown.  If you can’t physically, pull up Google Earth and take a digital fieldtrip around your new street.  You can also look up nearby restaurants, parks, or other activities and make a plan for a family outing once you arrive.
  4. Host a moving away party. It doesn’t matter if you’re moving around the block or across the country, a moving away party is a great and thoughtful way to commemorate your move.  Having a party with your kids will allow their old community to gather around them in a way that is positive and fun for everyone. This can encourage excitement and allow them to find their own feelings of anticipation for the move.
  5. Minimize change to your daily routine as much as possible.  Just because you’re moving doesn’t mean you should completely stray away from routine (although sometimes this may be inevitable). Try and keep your daily routine as similar as possible throughout the moving process.  This can help your kids feel more grounded, so even while their physical surroundings are in transition, important things like when they do homework, eat dinner, and go to bed stay the same.
  6. Pack a bag for moving day. Put together an easy-to-access moving day bag full of any special items your kids may not be able to live without while packing and unpacking – you can even include a special toy or treat for them to open when you get to the new house as a surprise! Items in your moving day bag can include:
      • Any special toys or keepsakes
      • A change of clothes or light layers
      • Entertainment materials
      • Snacks
      • Daily-use toiletries like toothbrushes, hair accessories, diapers, etc.
  7. Pack up big items while the kids are sleeping.  Packing up big, breakable, or especially time-consuming items while the kids are sleeping will help to ensure you get the work done without any distractions.  This may involve taking multiple trips to Goodwill, the dump, or your storage unit. When storing items, it’s important to consider factors that will keep them in good condition, which can depend on your storage unit features and the nature of the item itself.
  8. Use color-coded duct tape for each box. Using color-coded duct tape is helpful for families with multiple kids.  Having an easy-to-follow box organization system helps you know at a glance which box belongs where, and can help your kids move or unpack their boxes more effectively without constant supervision.
  9. Utilize online resellers.  For items that you don’t want to donate, but don’t want to or can’t move – excess clothes that are in good shape, bicycles your kids have outgrown, bulky or unused exercise or utility equipment, and so on – utilize online resellers.  Sites like Craigslist and Facebook Marketplace are great for getting rid of unwanted items without having to set up a yard sale or otherwise find a suitable buyer while in the middle of a move.
  10. Say goodbye to your old house.  On your last day, you should take some time to physically say goodbye to your home with your kids.  You can tailer this in a variety of ways – go room to room and say your favorite things about each room, what you’ll miss the most, or what you won’t miss at all.  If your house is sold, you could write a letter to the next family with highlights of your experience.  This time is for you and your kids to be mindful and appreciative of all that you have enjoyed about your old house, and experience a moment of closure.

How to Make a Gratitude List

If you want to feel more optimistic and lead a more mindful lifestyle, making gratitude lists might be a great exercise for you.  Gratitude lists are simple to create, but they can be quite transformative if you make them a habit! You don’t need any special tools to get started and it only takes a few minutes to jot down a few things you’re grateful for, so give it a try! After a few weeks, you may start noticing the positive changes in your life! 

  1. Write down at least 5 things every time you make a list, which could be every day! Writing down items such as you were grateful you took a nap today, or you’re grateful for your family stopping by, or you’re grateful that you put the dishes away. 
  2. Aim to be as specific as possible. Try to avoid those overly generalized statements.  For example, write down that you’re grateful that your friend came over and brought you soup when you were feeling sick today, rather than you’re grateful for your friend.  
  3. Include plenty of details that you can go back and read later on to remember. For example, you can write something like I’m grateful for the salty smell of the sea that wafts through my open window every morning. 
  4. Focus on experiences and people instead of objects.  There’s nothing wrong with being grateful for things that you own and you can certainly use those as examples sometimes. But keep in mind that gratitude lists tend to have more impact if you can focus on your experiences and the people in your life. For example, you can write that you’re grateful that I can afford to pay for my friend’s lunch when we go out together is better than saying you’re grateful for money in the bank.  
  5. Write freely and don’t worry about spelling or grammar.  This is for your eyes only so it won’t matter that you forgot how to spell something or you used the wrong grammar. Just focus on what you’re grateful for and let the words flow naturally. 
  6. Set aside 15 minutes before bed to write down what you’re thankful for that day.  Evidence suggests that people benefit from writing down what they’re grateful for everyday. 

#goalsetting #motivation


Latest News

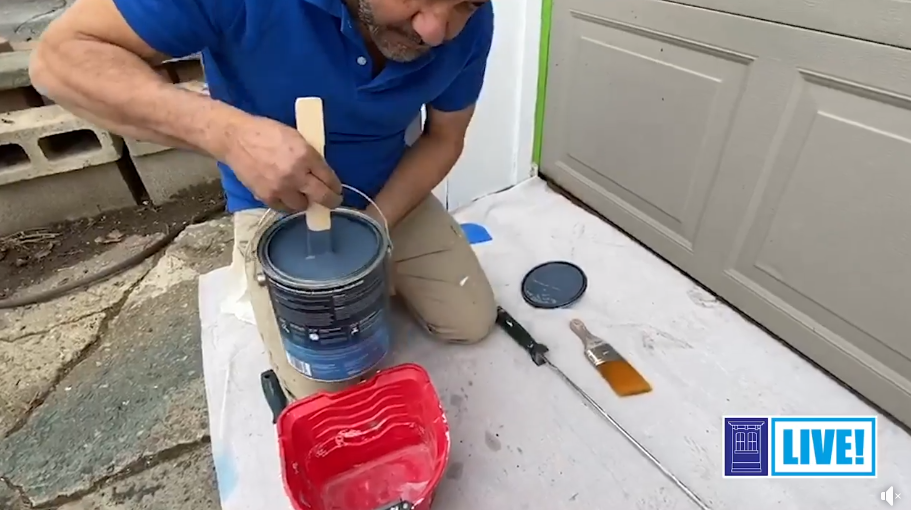
How to Paint a Vinyl Garage Door

Steps for Painting a Vinyl Garage Door:

  1. Start by cleaning the garage door with a cleaning solution of water and a small amount of a cleaning detergent.
  2. Scrub the door clean and then hose it down with water. Allow the door to dry before moving on.
  3. Protect the surrounding area with painter’s tape and drop cloths. The drop cloth will prevent any paint from spilling onto the driveway, and the painter’s tape can be used to protect the rubber gasket along the edges of the garage door from getting covered in paint.
  4. Cut around any window panes using the angled brush.
  5. Roll the rest of the garage door with the roller. Mauro suggests not cutting/rolling the whole door all at once, as that might cause the paint to dry in areas where you haven’t finished painting yet.
  6. Allow the paint to dry for a few hours and then apply a second coat using the same techniques.
 For further info and to watch the full video: Click Here. 

Do you know if you should hire a professional to install vinyl siding on your home?

Vinyl siding is one of the most popular and low cost ways to refresh a home’s exterior because of its low maintenance and being so easy to customize.  The average vinyl siding cost – including materials and installation – is about $11,107.00.

A far cry from the strips of shiny pastel colored plastic it once was, vinyl siding design has come a long way since its inception – much of today’s vinyl siding is difficult to discern from other exterior treatments.  It won’t fade, so the color stays true for decades, and it requires little more than an occasional wash to remove algae and mold growth.  Is it the right choice for your home?  The answer to this question will depend, and the wide range of costs reflects the variations in the market, the style of the home, and aestetic preferences.  Doing a little research on the cost of vinyl siding and available options will help you make the best choices and save money. 

Continue reading on: Click here

#curbappeal #outdoors